Tuesday, August 10, 2010

Review/Comparison on 3 Liquid Eyeliners I Currently Own

I'm going to do a Review/Comparison on 3 liquid eyeliners I own at the moment which are (in order in which I purchased and they're all black): Rimmel Professional Liquid Eye Liner, L'oreal Carbon Black Lineur Intense Felt Tip Liquid Eyeliner, and L'oreal Carbon Black Telescopic Precision Liquid Eyeliner.
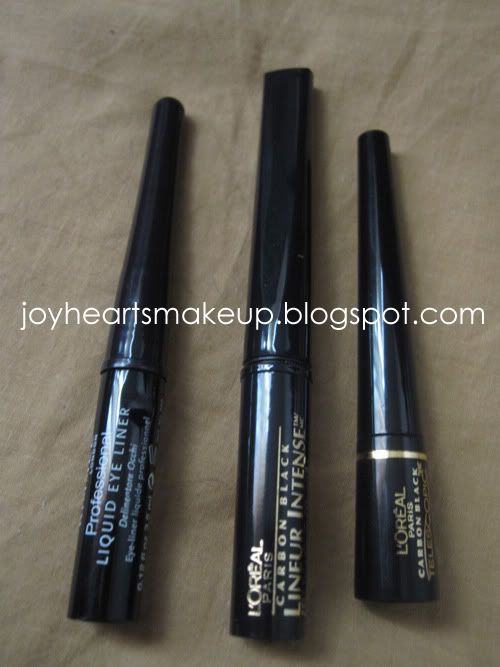
In terms of price I think the Rimmel is the cheapest, followed by L'oreal Lineur Intense and then L'oreal Telescopic. The prices do vary on where you go.

The packaging is nice on all three, shiny and black. I may favor the Lineur Intense over the three just a tiny bit because the handle is not completely round. As it goes to the tip it kind of flattens out so it's easier for me to hold and also to open.


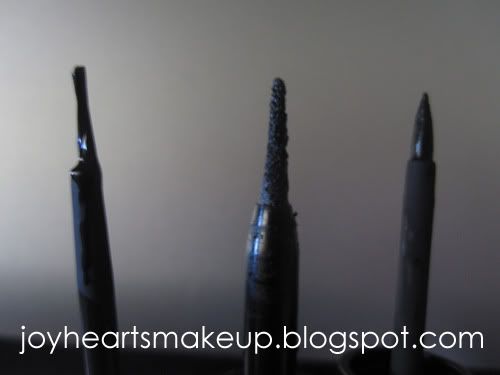
Now let's take a look at the brush. Rimmel has the thinnest brush and also the only one out of the three that has bristles. The other two have a sponge-like applicator. Lineur Intense has a long bendable sponge brush that's rounder at the tip compared to Telescopic. The Telescopic is obviously much shorter compared to the two and it's stiffer so it doesn't bend as you apply. It has the most pointy tip.


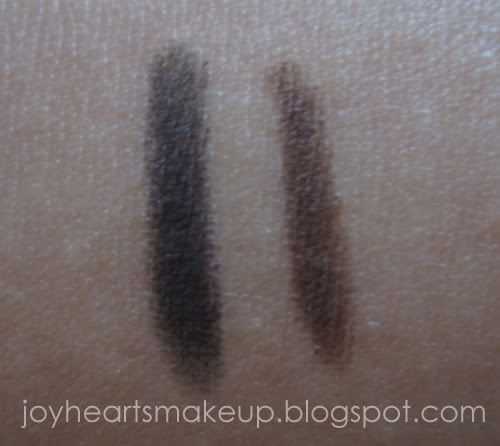
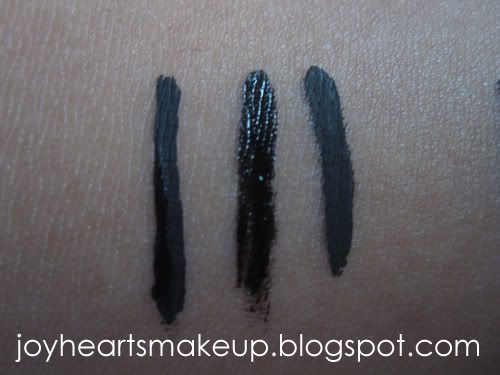
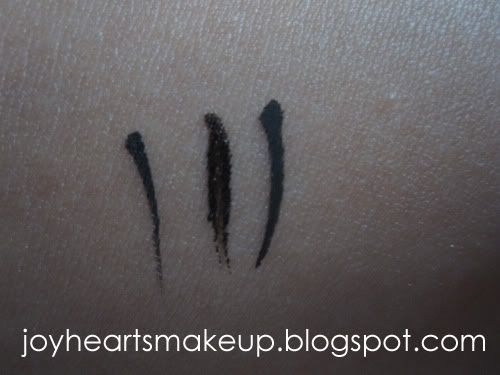
Here they are side by side with two swipes. Rimmel, Lineur Intense, and Telescopic. As you can see, Lineur Intense is the only one that doesn't dry matte. It's really shiny and it's the blackest out of the three. However, I think it's the most difficult out of the three to apply because the tip is kind of rounded. I have a difficult time making a winged eyeliner look with this. Or it may just be me and I need more practice, but I have used it for a while and I still have difficulties sometimes. Another thing is that you have to shake the bottle to get product on the brush, which I find a hassle sometimes.
Telescopic dried the fastest, and you have to be careful with this eyeliner because since it does dry so fast it's hard to edit your mistake. So I wouldn't recommend this for beginners. It's the best at making a wing because the tip is so pointy and the brush is stiff, that way you can really control the shape of your wing. However, I think this one is the most difficult in making a straight line on your lid even though it's good at making a wing. What I love about this one is that I can get really close to the lash line because of the stiff brush.
The Rimmel probably has the wettest formula. It takes the longest to dry and is the most prone to smudging. It dries matte similar to Telescopic. I think this is the best out of the three for beginners. I would recommend the Lineur Intense but the shiny finish is too much for beginners in my opinion, unless you want that look of course.


I tried to draw a thin line and the Rimmel creates the thinnest, second being Telescopic and then Lineur Intense. Although Lineur Intense is very black it's hard to create a thin line thus making it difficult to make a wing. Hollyannaeree is a pro at it though I don't know how she does it.


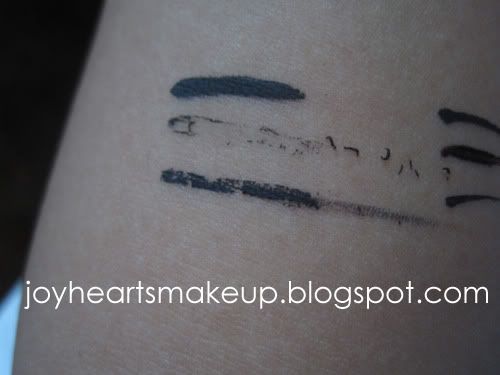
Now here I'm testing out the staying power. With just one swipe (with paper towel) Lineur Intense rubs off VERY easily. It kind of peels off rather than smudged off. Rimmel doesn't completely come off but it does smudge. Telescopic doesn't even budge! The staying power is amazing but like I said, it's difficult to remove when you make a mistake.


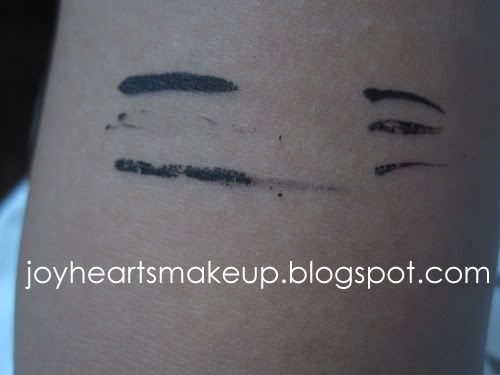
Here is a second swipe. Lineur Intense is almost completely gone, Rimmel is coming off, and Telescopic still hasn't budged lol. Btw don't mind the smaller lines, that's the swatch for the thinner application. I swiped it once in this picture.


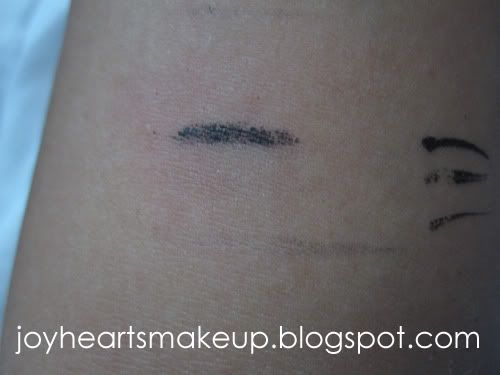
Finally, I rubbed it vigorously (you can see my skin is kind of red lol). Lineur Intense is completely gone! Rimmel left a subtle stain and Telescopic is clearly still visible. Telescopic can be easily removed with water, but it won't be completely gone. With makeup remover it's easy to remove, since you should be using makeup remover to remove makeup anyway, this shouldn't be a problem. I should point out that although Lineur Intense does rub off easily, it's pretty water-resistant and it only easily comes off when it's rubbed.


So here's an overview:

Rimmel Professional:
Brush applicator is made out of bristles; bendable
Thinnest application
Dries matte
Most wet formula / Dries the slowest
Smudges
Cheapest out of the three

L'oreal Carbon Black Lineur Intense Felt Tip:
Sponge brush applicator; bendable; rounded tip
Most intense black
Shiny finish
Thickest application out of the three
Difficult for winging out eyeliner
Rubs off easy
Water-resistant

L'oreal Carbon Black Telescopic Precision:
Sponge brush; small length; stiff; pointy tip
Dries really fast
Hard to edit mistakes so it's not for beginners
Best staying power
Easiest for creating a wing but not that good at creating a straight line on the lid
Most expensive out of the three

I would recommend Rimmel or Lineur Intense because they're easier to use and remove. Just be careful not to smudge or rub them off. Plus they're the most affordable. Telescopic is the most expensive but has the best staying power. It's better for more experienced people because it dries fast and makes editing mistakes very difficult. Thanks for reading! :)

Review: Kiss Mix or Match Glue-On Nails 2 Manicures in 1 Box Medium

I bought this set in Target because I saw that it was on clearance. It's a good deal because the set with 24 nails is $5.99 while this is double that for only $6.28. For only a couple cents more why not get the one with 48 rather than 24 lol. What really pulled me in to buy it were the nails with an elegant flower design. I think it's still in clearance and I saw a couple of them still in stock so go grab a box if you want to try them out. :) It comes with it's own glue so you don't have to worry if you don't have any at home. The packaging of the glue is kind of difficult to use though.
The size I get is usually medium because the small ones make my nails look small and stubby. My nail bed is decently long and I like the elongated look of long nails. The only thing I hate about this set is that the ones with the design don't give you the same nail design for each nail. What I mean by this is that the flower is on one corner of the nail, so of course I want the flower to be on the opposite corner for my other hand so they match. However, the one for my pinky and thumb only have the flower on one corner for both the nails. In other words, the two acrylic nails for my thumb (and also for my pinky) have a flower that's facing the same direction making it look weird! Idk I think I have OCD or something rofl. Another thing, which is only kind of minor, but some nails have to be buffed out on the edge where the white part is because some of them have a piece of the acrylic sticking out.
Anyway here are some pictures. :)


As you can see, it's a gorgeous design. It's elegant and I love the colors. A white flower with gold sparkly nail polish around it. White and gold = beautiful. Kind of a sloppy job on the nail application, but keep in mind this was done in less than 10 minutes lol. My boyfriend put it on for me right before we left for a party so I didn't have time to cut my cuticle and to custom shape the acrylic nails.
Just to point out what I was talking about earlier. Do you see my pinky? The flower is not on the same side as my other nails because they didn't have one for my pinky that had it on the same side. Doesn't look that bad but it kind of irritates me lol. I like things to be symmetrical or matching, I'm a perfectionist I know lol.


It turned out pretty nice. ^_^ It's been three days now and none of them have chipped off yet. If you want to try french nails with an elegant design to it, I think these are perfect and affordable.

Wednesday, August 4, 2010

NAKED Palette Review + Swatches

So when I first found out about this palette, I realized my boyfriend knew about it before me! And that he was already on the search for it because the Naked palette was a huge hit and was sold out everywhere! Fortunately, a brand new Ulta opened like 2 minutes from his house and he went there the first day of the opening to reserve me one. :) Of course I had no idea that he already paid in advance so that when they stocked up all he had to do was pick it up! When he finally got it, I didn't find out until like 4 days later LOL. He's so sneaky but so sweet. :) He freaking hid it in his Gundam scale model box and posted a picture of it on facebook saying 'I wonder when she'll find out ^_^". I thought it was cute hehe. So anyway enough of that intro!

This package comes with the Naked palette, double-ended 24/7 Glide-On Eye Pencil in Zero & Whiskey, and a travel-size of the Urban Decay Primer Potion. When I first touched the palette I was like "Feels so expensive!!". The outside is a velvet texture with the word NAKED shining on it. The case is so sleek and feels nice to hold lol.

The eyeshadows are all wearable and they work very well together. There's some pink/champagne, browns, golds, bronze, and a few darker shades. They're all really silky smooth, blend nicely, and SUPER pigmented. Also, the size of each eyeshadow is bigger than your average Urban Decay palette eyeshadows. The color I was most excited about was Half Baked because I love gold shades! Most of them have a sheen to them and there are only a few matte shades which I'm glad they incorporated in the palette. This is perfect for traveling (the colors are but not the case, you can easily ruin it) and I think this is a nice transition from summer to fall.


(Click for enlarged photo)


(Click for enlarged photo)


Btw is it just me or do the eyeshadow names sound kind of naughty or bad ass lol.

Virgin: Very pale pink that almost looks white. It doesn't have as much of a metallic look as Sin but it does have a sheen. A nice brow bone / highlight color.
Sin: Pink champagne color that's metallic-looking. I actually have this shade already from my Ammo palette. I love using this on my inner tear ducts because it is so metallic-y.
Naked: A matte light brown shade. I think it's pretty similar to my skin color so it will look natural on my lids. It's a nice color to kind of even out your eyelids and also for that natural look since it's matte.
Sidecar: Not sure how I should describe this color lol. It's kind of silver-ish pink-ish brown? Haha. This is the only shade that has chunky glitter which is a no-no for me! It has a lot of fallout which I don't like. I love the color but I probably won't reach for that often because of the glitter and fallout.
Buck: A matte medium brown shade. It's a perfect crease / outer-v color. I like using it on the outer lower lashline of my eyes to make it slightly bigger but not so dramatic.
Half Baked: A gorgeous gold color! Depending on the lighting it may look bronze-gold. I love using this as my lid color. I'm excited to try it in different ways.
Smog: A dark bronze brown shade that has a sheen. I also have this shade from the Ammo palette which is also another favorite of mine. It's great for the outer corner or crease.
Darkhorse: Dark chocolate brown with very slight sheen. It doesn't have much of a sheen compared to the other metallic shades. Also a lovely outer-v or crease color. I think it will look nice on the outer lower lashline as well.
Toasted: Kind of a deeper shade of Sin and also has the same metallic sheen. A lovely lid color but I would also wear it on the crease/outer-v.
Hustle: Dark plum color that has that very slight sheen like Darkhorse. I find that this is not as pigmented as the other dark shades. I still like it though, going to be a nice color for Fall.
Creep: Dark charcoal blue with tiny blue glitter. Good shade to use for clubbing or anything dramatic like a smokey eye.
Gunmetal: A pretty silver blue color with a slight sheen. Nice color for a smokey eye or even by itself.

Overall I love all of them! Only thing that turns me off is the glitter/fallout. Sidecar is the only shade that gave me that problem. I'm glad they have Sin and Smog since those are my favorite shades from the Ammo palette, coincidentally. :)
I definitely super recommend this palette. If you already have UDPP or the eyeliner pencils then just get it for the casing! Hahaha.

From left to right: Virgin, Sin, Naked, Sidecar, Buck, Half Baked, Smog, Darkhorse, Toasted, Hustle, Creep, Gunmetal Flash


Natural lighting


From left to right: Virgin, Sin, Naked, Sidecar, Buck


From left to right: Half Baked, Smog, Darkhorse, Toasted, Hustle


From left to right: Creep, Gunmetal


24/7 Glide-On Eye Pencil in Zero & Whiskey

Tuesday, August 3, 2010

ELF Haul/Review + Swatches

My first post on Blogspot! Although I already have a Tumblr I decided to make one because it seemed easier to post on and also you can customize it more. I feel like people are starting to make Tumblrs now though so idk haha. Anyway, moving on to the products!

This has been a long awaited haul/review post on the ELF products I bought during their 60% store wide sale. It took about 2 weeks to get here I think. I bought 26 items and it summed up to $40~$45, that's including shipping! Keep in mind though that more than half of the items are $3 or more, they're not just dollar items. So I think this was a really good deal! Now beware, this may be a long post. I tried my best to take clear and accurate pictures of the items. There's going to be a lot of pictures ahead so if you're interested please keep reading. :)


Click images for larger pictures.


High Definition Powder
This product is AMAZING. It's a white translucent powder that makes your skin feel and look smooth. I'm not even over-exaggerating I swear this makes your skin feel so smooth. For $6 this is definitely worth it! I wear it over foundation. My only complaint is the packaging, have to twist it like 3 or more times to get the cap off. Also, when you remove the cap a dust of powder flies out, I think that's because the product is so finely milled. But the product itself is awesome.


Studio Golden Bronzer
The colors are really nice. I think out of the three bronzers this one compliments me the best because golden colors look good on my skin tone. It's pretty pigmented and it also has a sheen to it. So I don't think this would work for contouring but it's definitely a nice highlighter. Because it has 4 separate colors, there's a color to match any skin tone. Another plus is that it has a full size mirror.


I swatched them individually and the one at the furthest right are all the colors combined.


Studio Eyebrow Kit in Ash
This product gives me the most natural looking eyebrows! You seriously cannot tell I'm wearing anything on my brows. It's really light so it's buildable. I already have full eyebrows so I don't need to use a pencil, I only need to fill them in to even it out. Left side is the wax and right side is the powder. I apply the wax first then powder, then I comb it through with a spoolie.


Studio Blush in Gotta Glow
I heard this is a dupe for Nars Albatross, but I don't own that so I can't personally say it is. On the pan it looks white but when you put it on your skin it has a golden sheen to it. It's really unique. This is a gorgeous highlight color.


Studio Blush in Candid Coral
I couldn't decide between this and peachy keen because honestly I didn't know the difference. I just thought they were both a peachy color. This blush is actually more vibrant compared to peachy keen and it's also more pink. If you want more color payoff I suggest getting candid coral over peachy keen.


Studio Blush in Peachy Keen
Compared to candid coral this is more natural looking. It's less vibrant so it comes out more of a natural and subtle flush on your cheeks. I don't think this would show up on dark skin tone though since it is on the lighter side. I find myself reaching for this more than candid coral just because I love looking natural.


Studio Blush in Tickled Pink
One of my favorites and it's a surprise because I didn't expect to favor this over the others. I initially didn't plan on buying this only because I thought I had enough pinks. I'm glad I did because I don't have a shade like this and it's also really smooth. All the studio blushes are really smooth. This particular one gives a nice subtle pink and it's hard to overdo it, so I feel like I have really good control when applying it. That's really good when I'm in a rush.


Studio Blush in Fuchsia Fusion
I was kind of disappointed when I first saw this and swatched it, it just seems so freaking glittery. I don't want to look like a disco ball. I love the color itself but the glitter needs to leave! Lol. I intended to get Pink Passion but they were out of stock when I ordered.


From left to right: Gotta Glow, Tickled Pink, Candid Coral, Peachy Keen, Fuchsia Fusion


Mineral Blush in Rose
A super gorgeous color! It gives you a beautiful rosy color on your cheeks but you do have to be careful since it's in loose form. I only ordered one because these were $5 and I wasn't sure if I would like them. They're really silky smooth.


Natural Radiance Blusher in Flushed
These blushes are a little more chalkier compared to the studio blushes. The color is really nice though, kind of a mauve pink. I have to be careful though because since it is a vibrant color, it could look muddy if I'm careless.


Natural Radiance Blusher in Innocence
A very nice pale pink. I didn't own a color like this and I wanted to see how it looked on my skin, since it was cheap I thought why not. I think this would look better during winter since it is so pale, but nonetheless is a pretty blush.


Top to bottom: Innocence, Flushed


Healthy Glow Bronzing Powder in Luminance
I don't even know how to beginning. I LOVE this powder, it's the best highlighter I've owned so far. Although it is a bit chalky I don't think it really matters to me. It gives the most beautiful and natural glow to your skin!! It doesn't have any chunky glitters so it looks nice on me. I'm afraid to use highlighters on the bridge of my nose that have huge glitters because I have large pores. But this is my favorite! And it's only $1! It's a beige colored powder so it blends really well on my skin. It's impossible to go wrong with this.


Shimmering Facial Whip in Spotlight
I heard this is a dupe for Nars Copacabana, I don't own that either so I can't tell you. It's a nice sheer highlighter and I think this would fit any skin tone. It's kind of watery so it's really easy to blend. My only complaint is the smell.


Shimmering Facial Whip in Golden Peach
I thought I should add a golden liquid highlighter to my collection since I think golden colors compliment me nicely. Compared to spotlight this is a little bit harder to blend I don't know why. It feels more sticky but it's still blendable.


Left to Right: Luminance, Spotlight, Golden Peach


Mineral Eyeshadow in Temptress
I was pretty disappointed when I first saw this. It's mainly because of the color. Based off swatches I saw online I thought it was going to be a neutral color, but it's actually a pastel lilac color and it's completely matte. I have no idea how I'm gonna use that. I think I might use it underneath darker more vibrant colors to tone them down.


Mineral Lip Liner in Natural
I thought the color would look natural on my lips but it's actually a little bit too dark. It's really smooth though. I could use it under bright lipstick or lipgloss to tone them done. Staying power is okay since it's so creamy.


Mineral Lipstick in Nicely Nude
WTF is that hair strand doing there?! GTFO. So yeah these mineral lipsticks are really creamy and smooth. However! They all seem to be frosty or something, which doesn't look nice on my dry lips. When I look closely there's a lot of very tiny gold shimmers. They're a little bit sheer so I have to build it up. I don't know how I feel about them yet, I have to keep using them to really tell. I might just use them with other lipsticks or lipglosses. This particular color is the most natural lip color on me.


Mineral Lipstick in Runaway Pink
This one is kind of like a baby pink with slight blue undertone. That doesn't look so great on me lol but I think I can make it work by layering lipstick or lipgloss over it. It kind of reminds me of Snob by MAC.


Mineral Lipstick in Party Pink
This is a more deeper pink that very slightly looks coral.


From left to right: Nicely Nude, Runaway Pink, Party Pink


Studio 11 Piece Brush Collection
These brushes are SO SOFT. They're some of the softest brushes I own. I bought the set because if I bought them individually it would cost $33 but I bought the set I save $3 plus I get a case lol. They have a slight scent to them which will probably go away overtime. Super recommend.


From left to right: powder brush, blush brush, angled foundation brush, fan brush, complexion brush


From left to right: contour brush, eyeshadow brush, concealer brush, small angled brush, small smudge brush, small precision brush


Nail Polish
From left to right: Innocent, Desert Haze, Smoky Brown, Mod Mauve
I haven't tried these out yet so I don't know what to say. I've seen swatches of them and they look really nice. I heard you have to put 2-3 coats to get a really good opaque color. Since it's only a dollar I wouldn't be surprised if they were sheer. I actually wanted other colors but they were out of stock of the ones I really wanted. I'm eager to try out Desert Haze it's a really light gray color.


Oil Blotting Sheets
These are pretty decent, they take a while to remove all of the oil. I have to use at least two sheets, so I just grab two and use them together to make it more effective. They work but you just have to do extra work lol.